Wednesday, June 25, 2008

bluer than blue

I had a chance to shoot outdoors last June 19-20 and this opportunity lent me a time to experiment on my landscape camera settings. The landscapes of the Ilocos Region presented me with some fascinating places where i could try such settings that i have in mind like the Bangui Windmills and the nearby Cape Bojeador Lighthouse.

Familiarizing with your camera's controls and settings should be your first priority if you want to improve on your photography. So, i ventured into an experiment where i tried using the D300's Active D-Lighting feature to the hilt in most of my settings. Common sense further dictates that i should try tinkering with the Vivid settings of the Picture Control to get rich and vibrant colors.

Based on what we have read on the manuals, "Active D-Lighting preserves details in highlights and shadows, creating photos with natural contrast. Use for high contrast scenes, for example when photographing brightly lit outdoor scenery through a door or window or taking pictures of shaded subjects on a sunny day." It is an in-camera extension of dynamic range and as distinguished from the previous D-Lighting feature of some models of Nikon DSLRs, Active D-Lighting is activated before taking the photo and not the usual post editing correction tool where you can tweak the highlights and the shadows after the image had already been captured and stored on the memory card.

Since the feature was meant to increase and record a wider range of lights and shadows, it will take the camera a longer time to process and record more information about the image before saving it on the memory card and this is where the faster CF cards should reign supreme over the cheaper brands. I'm only using Ridata and PQI or what you call the lesser brands but i don't find any significant drawback on their writing speeds.

With the Active D-Lighting turned ON, one is supposed to expect a reduction of the blown highlights and a preservation of details on the dark areas. I experimented with the various options available on the Active D-Lighting feature and i found out that on landscapes with extreme contrast on a sunny day, the High setting is the most desirable for my needs. Why? because it makes the blue skies bluer and that was my objective in mind when i ventured into this shoot. Of course, the Vivid setting on the Picture Controls played an important role too in darkening the blue skies but this setting should be tamed a bit if you're taking environmental portraits where you have people on the foreground. A Vivid setting will likely give you a reddish to orange brown skin tone and this is not natural.

With the right camera settings, one can do away on the use of polarizing filters which are meant or designed to make the skies a little bluer than what the eyes can see. I shun away from using filters primarily because it gives the photographer an easier task and the results are somewhat predictable to the trained and experienced eyes thus making you look more like a cheater than a creative photographer. This is aside from the fact that filters are an extra cost and additional bulk to what you might be bringing on your photoshoot trips.

On hindsight, i was also thinking that my Sunny white balance setting contributed a significant role on the overall results that i got from this shoot. The contrast is very much desirable and was further enhanced by the Active D-Lighting on the D300 which i find effective especially when shooting on harsh lighting conditions. If properly used, the Active D-Lighting feature would give you an HDR look image without the vulgar and extremely artificial effect of an overdone HDR. It pays a lot to tinker and play with your camera's controls and settings and if i were you, i would start shooting more than buying or accumulating gears which you don't know how or when to use when the need arises.

The first two photos above were taken at the beaches of Bangui Bay where the fifteen windmills generating the power requirements of the province of Ilocos Norte were presently installed. The rest of the photos were that of Cape Bojeador Lighthouse which is situated atop of a hill in Burgos, Ilocos Norte.


I am very much grateful to Vince Gaspar for tagging me along while he's on a business trip on the northern part of the Philippines.

Tuesday, May 27, 2008

My D300 Experience

I got my Nikon D300 last week of April and it's barely a week in my custody when I was presented with an opportunity to test its mettle on an outdoor and studio shoots using two of my least favorite lenses, the Nikkor 50mm f/1.4D AF and the Nikkor 24-85mm f/3.5-4.5G ED-IF AF-S. Don't get me wrong when I said 'least favorites'. They are the cheapest lenses in my dry box but nonetheless, the most abused and ironically, you might call it my 'most favorite' lenses indeed. If you're going to ask me, what lens is dearest to my heart right now and without blink of an eye, i would say the Nikkor 85mm f/1.4D IF, since i shoot mostly portraits.

Without much variance in ergonomics and control panel placements, the D300 is very much similar to my previous D200 except that I now enjoy the Expeed image processing capabilities, high ISO shooting and longer battery life of the D300. I'm not a sports shooter so I still have to appreciate its faster FPS and its vaunted 51 focus points in 3D. But initially, after pressing the shutter release button when I first got a hand on it, I find the D300 a more snappy camera compared to the D200. I'm not a landscapist either so I haven't discovered the benefits of it's Active D-Lighting feature yet which according to papers, can greatly enhance dynamic ranges of the shadows and the highlights for a more vivid and detailed image capture.

Last May 2, I had a chance to shoot Roxanne, a local celebrity here and the results I got were very much pleasing. In this outdoor shoot, I fitted my old reliable 50mm f/1.4D to the D300 to find out if it can exceed what the D200 had achieved in the past. Though I had better results in using that lens before with the D200 but those photos were taken when the lighting was extremely helpful for an outdoor portrait session. With harsh lights producing unwanted highlights, the first two photos of Roxanne were an instant success having been taken without any aid from my speedlight which I usually bring out from my bag when giving an extra hairlight would make the image more pleasant.

After a brief outdoor experience, we decided to shoot indoors on a studio set-up using regular strobes. For more flexibility, I have to change lens and this time I fitted my slow but reliable Nikkor 24-85mm f/3.5-4.5G ED-IF AF-S to the D300. Being a consumer grade lens, it is obviously inferior to what my 85mm f/1.4D can produce under the same shooting conditions but nevertheless, it can respectably provide good results too.

Using a softbox and a brolly and later on a third light placed at the back of the model, we were able to get results like the last four photos in the samples. While tinkering with my settings, I am quite a bit surprised when I was able to fire the strobes at above 1/320 flash synch which is the rated max speed for the D300. I reviewed my flash settings and these were what I got: the D300 was set to flash in TTL Mode, the SB800 was set to manual @ 1/128 flash intensity or just enough to trigger the sensors of the strobes. I shoot in Manual Mode as always and whenever I exceed the shutter speed to more than 1/250 sec., I get a black or blank image.

With the D300, the flash synch speed can go as high as 1/320 as long as you choose the Focal Plane option in the menu. But with my experience, I was able to fire the strobes and get an image even above 1/320 shutter speed. I experimented with different speeds and discovered that I can get away with it only up to 1/500 sec. shutter speed. Beyond that, the usual black screen or blank images will now appear on your LCD screen.

The journey and experimentation will continue and photography is such a never ending conquest of technology and capture of beauty. Years or months from now, the D300 may have another iteration but my resolve to grow old with this hobby will not preclude me from trying out new gears as they come in the future. As they say, enjoy it while it lasts and for now, I'm looking forward to an FX format in a D300 body.

For modelling credits, much pleasure to thank Ms. Roxanne Barcelo for the shoot. Make-up by Pam Dionisio while the venue for the studio shoot was offered by Jobbit Mata.

Thursday, April 10, 2008

dramatic lighting set-ups

The basic purpose of lighting is to bring out the subject to make it visible in a photograph. But for the advanced photographers who are simply tired of flatly lighted portraits, lighting is a process of setting up the lights to impart personality and character to a portrait and fill it with emotion. Unknown to many, dramatic lighting can be achieved with just a single light source strategically placed to a location where it can create high contrast shadows on the face of a subject. Before we venture into this discussion, we should first familiarize ourselves with the basic lighting set-up composed of three lights: the key or main light, the fill light and the back light. Since I am using Nikon speedlights, SB800 and SB600, in my sample photos, I will limit my discussion on lighting techniques with these speedlights as my light sources.

The key light is the strongest light usually placed on a high angle and on the side of the subject. It is mostly mounted on a reflective umbrella directed towards the face of the subject. The fill light or the weaker light can be provided by a light source mounted on a shoot through umbrella or if dispensed with, can be sourced from a reflector or from an existing natural light. The back light separates your subject from the background to create an edge light on your subject.

Going back to our topic on dramatic light set-ups, a single light source may just be enough to light your subject if you know how to set it up in such a way that your light direction will properly hit your subject's facial contours to give it an outline of shadows and highlights. In my first sample portrait above, the light source was placed on the left side at angle in front of the subject to create shadows on the right side of the model's face.

The second photo from above was lighted by a key light placed on the right side slightly at the back of the model while the third photo was lighted by exactly the same set up but this time the model was instructed to move a little bit backwards. The light provided by the key light perfectly illuminated the facial countours and since it was placed at the back of the model, it serves as a backlight too and created some edge light on the head and shoulder of the model.

The fourth sample photo was lighted by two light sources and they were set-up to achieve a Rembrandt effect. The Rembrandt effect is a high contrast lighting scheme and is achieved by placing the key light at a high angle to your subject's face. The Rembrandt effect is characterized by a triangular light underneath the subject's eye. It also allows the nose shadow to blend in with the shadow on the dark side of the face.

The last two photos were shot on an indoor location and ligthing the subject with a light source mounted on board a camera would not achieve the same effect so using two light sources placed away from the camera will do the job. On the fifth sample photo from above, the model was asked to posed on a hallway corridor. The key light was placed on the right side and in front of the model while the fill light/backlight was placed on the right side at the back of the model. On the last photo on the stairway, the key light was placed at a high angle on the left side of the model while the fill light was pointing directly towards the face and was placed on the ground.

For modelling credits, I would like to thank Klaudia Batzler, a Filipina-German who gamely followed my instructions. Make-up services was provided by Pam Dionisio.

Sunday, March 30, 2008

high dynamic range images

High Dynamic Range imaging (HDRi) is often called the process of combining bracketed images with different exposures and subsequently tone-mapping the resulting image to give a high and exaggerated dynamic range with more details on the highlights, shadows and midtones.

When doing HDRi, I use the trial version of Dynamic Photo HDR from Media Chance and it is a better software, for my requirements, than what the Adobe CS3 can offer.

Your very first concern when processing images in HDR is to get at least three (3) images with different exposures. The more images of the same scene is of course better so that you can set the EV value increment to a narrower figure. Getting a series of the same scene would require you to set up a stable and sturdy tripod where you will mount your camera. Fortunately for me, I am using a Nikon D200 where it can take a series of shots up to nine (9) frames. Other Nikon DSLR models like the D80 and lower models can only take three (3) frames. Doing this would again necessitate to set the camera to a Continuous Shooting Mode and triggering the shutter release button thru the built-in timer function or with a cable release gadget you attach to the camera to prevent any camera shake from affecting the frames of images you will need to combine when doing HDRi.

Now, assuming you already have at least three (3) images to process with, load this image using Dynamic Photo HDR. For a quality compromise, it's better to have at least five (5) images of the same scene to work with.When these images with bracketed exposures were already loaded, the next thing to do is to check whether these images are properly aligned. You can align them automatically or manually but I'd rather do manual alignment and rely on my sense of sight's judgment. You can tweak the merged images with advanced options like pin warping and anti-ghosting options but that is for the advanced users.

After you've finished the alignment process, you're now ready to tone map the exported HDR image. With Dynamic Photo HDR software, you have six (6) tone mapping options: Eye-Catching, Ultra Contrast, Smooth Compressor, Auto-Adaptive, Photographic and Human Eye. Ocassionally, I always get better images for my taste whenever I process the HDRi on the Eye-Catching mode but I also have great results using the Ultra Contrast mode. When you want subtle results or less-than the hyper realistic HDR effect, you can either process your HDRi using the other options mentioned above.

In the examples given, the 3rd and 4th photos from top were both processed in Ultra Contrast mode while the rest of the images were all process in Eye Catching mode.

Sunday, February 17, 2008

creating composite photos

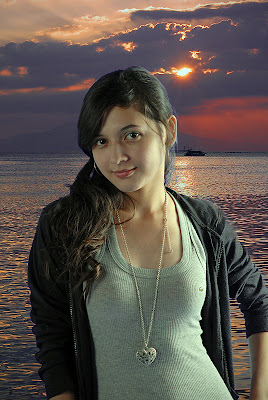
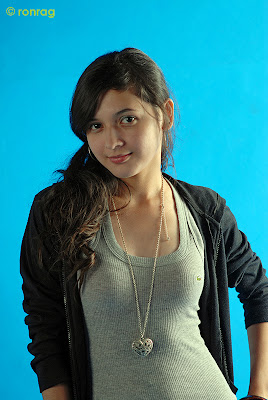
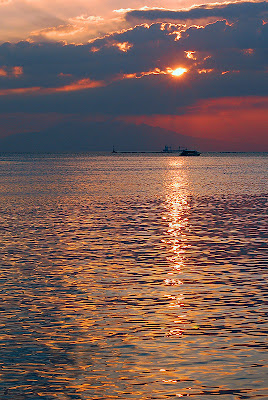
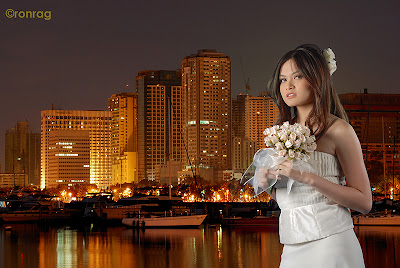
Composite photos are two or more photos merged or combined together to form a single image. Compositing pictures can be easily done in Photoshop but I will limit my discussion here to merging two images only. First, pick your photos to be combined by opening both image then choose which one will be layered on top of a background image. In my samples, I picked a subject or a photo of a person to be my main image and an environmental or a landscape photo as my background image.

I have to choose a photo with a plain background or any portrait shot in a studio with a solid color background would be fine. We can select the subject by using the Color Range Tool and point it to the colored background. Set the Fuzziness to a level where the selected portion would be uniform all throughout. In my samples, I set the Fuzziness to 100 but this may change according to each individual photo you're working with. When the selection is done, go back to Select -> Inverse to inverse the selection to choose the subject.

Now that the selection (looks like a running colony of ants encircling the image) is transferred to the image of the person, click the Move Tool in the sidebar to activate it. Using the Move Tool, transfer the selected portion to the background image. You now have to scale the size of the main image to a size you think would suit on the background image. You can do this by going to Edit -> Transform -> Scale. You can now resize the main image. If you want to correct the perspective and adopt it the background image, use the Perspective option Edit -> Transform -> Perspective.

The most common problem that I always encounter is how to smoothen out the selected image from the main photo when it is already transferred to the background image. There is usually a residual color from the background of the main photo that is also transferred to the background image. In my samples here, the sky blue color of the background from the main photo is too disturbing to be left ignored. I use the Eraser Tool set at a very low opacity to slowly but surely erase those unwanted color residue. You should zoom in on the image to work more accurately when you are erasing those residual colors and do this on the layer of the main image.

When you're done with the resizing and erasing tasks, you can still move the selected image to any place or position on the background image as long as you have not flattened the layers yet. Once you are finished with these tedious tasks, you can now flatten the image. In my two samples, I preferred merging the layers first before proceeding with my usual workflow on image enhancement but nothing will prevent you from doing the image enhancement on the layers itself if that is your pleasure.


All images used in this tutorial are copyrighted and strictly prohibited for distribution or downloading without my express written consent. Special thanks to my two favorite models, namely Pearl (first model) and Madie (second model) and to Wren Yuson for doing the make-up and who, incidentally, is also one of my favorite model.

Thursday, January 31, 2008

Nikkor 85mm f/1.4D IF: The Creamy Lens

I sold my Nikkor 12-24mm f/4G ED-IF AF-S to fund the purchase of this much acclaimed lens. It's not that the Ultra Wide Angle (UWA) Nikkor is no good but I'm simply not fond of shooting wides because of DX resolution issues with ultra wide angle lenses and I'm more of a portraitist than a landscapist. I don't want to rot the Nikkor UWA in my bag so I decided to let it go and got myself this portrait lens.


This lens is not locally available so I ordered it from someone who sourced it out in Hong Kong. After four days of eagerly waiting, I finally got this lens and the next day I tried using it on a studio, shooting some lady friends. My first hand experience was not depictive of its capabilities because of the controlled lights we used inside the studio. An outdoor photo opportunity was forthcoming two days after my studio shoot and I was so excited trying out this lens on outdoors for the first time.


It was indeed a pleasurable lens to use and I had a chance to see it in action shooting this wonderful lady from the United Kingdom by the name of Natalie. The Nikkor 85mm f/1.4D IF is one of the best lenses that I have used so far. It is extremely sharp, the contrast and color saturation are good and the bokeh is so smooth and silky that's why it is fondly called as "the creamy lens". The build quality is likewise beyond reproach and good lenses like this are always Made in Japan unlike consumer grade Nikkors which are usually manufactured in Thailand.


The 85mm focal length is best suited for 3/4ths, waist to head shots or half body portraiture while the 105mm focal length is good for head and shoulders portraiture. Having tried it outdoors for the first time and with Natalie as my first subject to work with it, it was really a pleasurable experience. Natalie is a very professional model who is currently based here in the Philippines. Despite her constant movement, which is a sign of an experienced model, the creamy lens is fast enough and can easily adjust its focus with the D200 spinning its motor. I tried shooting at wide open, f/1.8 to f/2.5, the sharpness is impressive and the out of focus portion blends well and the bokeh circles are rounded and not polygonal like my Nikkor 50mm f/1.4D AF. It's bokeh rings are bigger than its f/1.8D sibling obviously because it has a wider maximum lens opening.
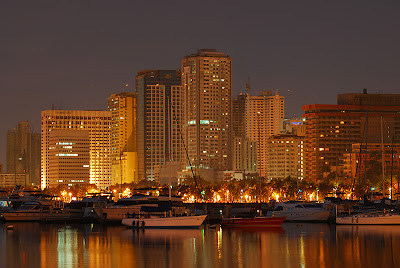

The blurry background or what we call bokeh is so creamy and not crunchy like the bokeh of my long forgotten Nikkor 70-300mm f/4-5.6G. Compared to my Nikkor 50mm f/1.4D's bokeh, this 85mm is a lot sweeter and smoother. Having tried it indoors inside a moderately lit restaurant, the D200's setting can go down as low as f/1.4 aperture, 1/60th shutter speed @ ISO 200 shooting at 2500 Kelvin to eliminate oversaturation of colors. This lens is very heavy and is made to last for a long time. I am more of an available light shooter than a strobist that's why this lens is a must for me. Although I like playing with the lights in CLS, I still think getting this fast lens can make me a more versatile portraitist. This is a very pricey lens but in photography gears, we always get the advantage of what we pay for no matter how miniscule it may be.


Modelling credits goes to Natalie with whom I'm very grateful for having had the opportunity to shoot a British national for the first time. Make-up by Pam Dionisio.

Monday, December 31, 2007

slow shutter night portraiture

Night photography is one field of photography where experience on time exposures will come in handy. In this type of photography, light meters or even metered camera settings of your high tech DSLR camera will not yield or give an accurate resulting image. In all likelihood, you will take your shots on a trial and error basis and adjust your settings accordingly depending on the results of the initial images taken by your digital camera.

On the photos given as samples, my goal is to get a properly exposed background for my models who should stand still for at least two seconds to prevent or minimize any movement while the shutter is letting in some light from the background. A desirable set up would be to mount the camera into a stable tripod and use a cable release trigger or set the camera's timer delay trigger to prevent any camera shake from affecting the clarity of the image. Don't forget to instruct your model to stand still for a few seconds even after the flash had long since fired.

The photos uploaded as samples were all taken on a time exposure of more than one second. The camera's flash was set to a rear curtain flash setting and was mounted to a tripod. Rear curtain fired flash means that the flash will fire right before the shutter closes as distinguished from front curtain flash firing where the flash is triggered immediately right after the shutter release button is pushed to the hilt.

The Creative Lighting System of my Nikon gave me a reliable and predictable results from its wireless flash photography. When shooting night images, white balance setting is also critical to appreciate the image you're taking. In these examples, my experience and familiarity with Kelvin settings provided a nearly accurate and desirable results of balancing cool and warm temperature settings for the image. For credits, I would like to thank Zette, Nadine and Darlene for this lingerie shoot and to Pam Dionisio for providing the venue and make-up services.

Friday, November 30, 2007

extreme ways

Extreme shooting takes place when you're taking pictures on outdoors on a sunny day or where there is an overcast sky where there is an uneven flow of light, thus, your camera's metering becomes unreliable in balancing the highlights and the shadows it sees in the frame. With these existing conditions, your camera's metering and white balance will have some difficulty compensating for the colors and if you're shooting portraits, you may either get a tanned skin or a washed out portion of the skin due to the presence of highlights.
If you are using a Nikon camera with matrix metering capabilities, these extreme shooting conditions will be much easier to handle. In my case, I optimize the image by using either the Normal, Softer or Portrait preset setting in the Optimize Image Menu. Avoid using the Vivid or More Vivid setting for the reason that these settings will oversaturate the skin tone which is not good for a portrait under these extreme shooting condition.

As mentioned in one Nikon handbook, "Nikon's 3D Matrix Metering employs methods of exposure calculation that automatically apply exposure compensation, depending upon scene brightness and contrast and distance information. As a result, your subject, whether it is centred in the viewfinder or not, is given corrected exposure in most lighting situations." Canon calls this metering algorithm as "Evaluative Metering" but if you'll make a research on who came up first with this innovation, you'll find out it will be Nikon.

Nikon's Matrix metering, introduced as "Automatic Multi-Pattern" (AMP) metering in the FA camera in 1983, was the world's first meter that actually measured exposure, instead of just light. It is one of the most important advances in photographic technology. This meter knows how to make white snow or sand look white, instead of a conventional light meter's making everything look medium 18% gray. It applies the zone system automatically to attempt to render a correct exposure under difficult and contrasty situations. When shooting in a hurry under rapidly changing conditions, which is the whole point of using a small format camera like a Nikon, there is no better way to meter your exposures. excerpts from Nikon Matrix Meter by Ken Rockwell, 19 August 2001

With the later Nikon DSLRs, Color Matrix Metering is now a standard feature and this is perhaps why Nikon images have a better color rendition. Based from what I've read, this metering function allows yellow as light as it should be while it captures red as dark as should be.

I particularly like these photos to show how extreme shooting can be fun. The last six photos uploaded were taken under extreme conditions and no ordinary photographer would dare taking these images if they are not equipped with technical knowledge on how to choose the proper settings on their camera. The streaks of light lend some sort of niceties on these images.

Special thanks to my favorite model, Pearl Cedro, for this photoshoot. The first four photos were taken by a Nikon D200 fitted with a Nikkor 70-300mm f/4.5-5.6G AF-S ED-IF VR lens while the last three photos were taken using the same camera fitted with a Nikkor 50mm f/1.4D lens. You will notice that my favorite Nikkor 50mm f/1.4D takes sharper images compared to the Nikkor 70-300mm f/4.5-5.6G AF-S ED-IF VR lens but the latter's bokeh is very much desirable.

Wednesday, October 31, 2007

my Nikkor 70-300mm f/4.5-5.6G IF-ED AF-S VR zoom

It's been more than a month since I acquired this lens from Mayer Photo and it replaced my Nikkor 50mm f/1.4D as my work horse lens since then. For shelling out a moderate amount of P25,000.00, I can now shoot in a low light environment on almost any place with poor light conditions, with its VR feature turned ON and pushing the ISO setting to ISO 800 . On an overcast day, like in the photo above, I can shoot at 1/60 without blur using a 170mm focal length at ISO 250. At this focal length, bokeh will appear on the background which is generally smooth and not crunchy compared to the blur produced by the Nikkor 18-200mm VR at the same focal length.


This lens is a full format lens suitable for any future full frame Nikon DSLRs like the D3 but with my D200, with a crop factor of 1.5X sensor, the scope of its field of view would be in the focal lengths of 105-450mm. The sample photo above was taken at 230mm focal length with a shutter speed of 1/200 at f/5.3 aperture in ISO 400. One can readily notice the smooth blur of the green grass which is called bokeh, or pleasant blur.

At ISO 400, one can get better color rendition than shooting at ISO 100, which is what i've experienced in the two or more years that i've been shooting in digital. Again, the sample photo on the right which was shot at ISO 400 is another classic example of a good color rendition.

With not much choice of lens, I tried the 70-300mm AF-S VR inside a studio with strobes as main sources of light, and the results were equally amazing - sharp image and accurate and fast focusing even in low light where my 50mm f/1.4D would have faltered and encoutered difficulty. The two sample photos on the left were taken at its shorter focal lengths and who says one can't use a telephoto in a studio set up?!

Of course, using the 70-300mm VR in a cramp studio would limit your ability to take better shots and would confine you to only facial or head shots or half body portraits. When using strobes, you should also turn OFF the VR function to save on battery power as the VR would be a useless feature when your subject is being lighted by strobes.

One last test I made on this lens was shooting with it indoors using continuous lighting from a home lamp. The result was the sample photo on the right which was taken at ISO 800 shooting at f/5 at a slow shutter speed of 1/8 at a focal length of 165mm. Without VR or any anti-shake feature, the rule of thumb would be to shoot at a shutter speed of 1/(focal length) or in this case 1/200 to avoid any blurring of the image. With the VR feature ON, one can have more luxuries in shooting in low light conditions.

Credits goes to the following in the order of their appearance from top to bottom: King, Margarette, Tey, Wren, Bianca and Pearl, I am very much grateful to all of you.