Thursday, December 14, 2006

Toned Black and White Photos


Kiomi
Originally uploaded by ronrag.
As they say, presenting a nude photo in black and white or duotone is more dramatic and it evokes emotion. That's why after shooting some nude portraits in colors, i searched the net and found another way of converting a color picture into a high contrast black and white using the Calculations Option in Photoshop CS2. After opening your photo, go to Image -> Calculations.


There are a lot of choices as your Source configuration but I found this combination: Background-Gray, Background-Gray, Pin Light, New Channel as the most suitable for my purpose. Click OK and voila... you now have and instant high contrast black and white photo. This is perhaps the simplest way of converting a Color photo into a striking Black and White.
You cannot, however, save the photo in the JPEG format unless you go to Mode -> Grayscale then Save. It doesn't have to stop there... you may want to improve it further by applying a simple toning technique and here it goes. Bring down the dialogue box again Image -> Mode -> Duotone. Then after seeing the Duotone box, choose Type: Quadtone.
You can find 4 different presets in the Quadtone and in the PANTONES folder, i selected this option Bl 541 513 5773. Click the LOAD and hit OK. To save your processed work, you will have to convert it back as an RGB file in order to save it as JPEG file. IMAGE > MODE > RGB then Save the file.


Thanks to Kiomi for being such a fabulous model

Saturday, November 18, 2006

The Nikon Rebirth

Last November 11, 2006, the Nikonians in the Philippines were given a treat by Nikon's local distributor, Columbia Digital Sales Company, in a party thrown for the purpose of reuniting, and igniting the passion of, the more gifted and privileged photographers who uses Nikon as a tool of their craft. The Canonians can boast and claim of having a better technology packed inside their DSLRs and a reliable local support service but ask a Nikon guy and he will have a gritting and intantaneous refutation to the contrary. Well, let's cut the crap and be more objective!! Whatever brand of camera you use, your photos will only look as good as your artful taste will dictate - that's a fact and we should leave it at that!

At the helm of the new management of soon to be known Nikon Philippines is Anderson C. Tan, President and General Manager of Columbia Digital Sales Company, a venerable guy who took over his father as the chief operating officer of this old but reemerging company, and who candidly promised to take the Nikonians into a higher level of satisfaction when it comes to service support and more dominating presence in the local photography industry.

Nikon as a camera brand has long been the choice of creative photographers and hobbyists and got a snag only when it can't cope up with the technology advancement made by its main rival, Canon, who now uses CMOS sensors in all their latest models of DSLRs, which if compared to Nikon's CCD image sensors, are known to be more power efficient thus, supposedly better in the field of noise management as theory would spell it.

Canon who manufactures its own sensors reigns supreme for quite sometime but Nikon, who either buys or have its sensors custom-made by Sony, didn't throw its towel and conceded defeat to Canon, when it subsequently regained its reputation in the world of digital photography as soon as it bagged several citations and consumer awards as a result of the world-wide acceptance of its better DSLRs. Reviews and consumer evaluation as well as feedbacks from professional users have it that a Nikon designed DSLR reproduces more vivid and richer colors. The user-friendliness of its features and the tank-like build quality, even in its plastic DSLR models, sets it apart from its main competitor's similar products.


Despite knowledge of Nikon DSLR's shortcomings, I would still prefer getting a Nikon anytime for the reason that, aside from what had already been mentioned and its publicly known reputation, i like Nikon's Creative Lighting System. Their DSLR's may not excel much on low light conditions when shooting on High ISOs but this system is, nonetheless, a more versatile tool in the field of flash photography. Using its wireless TTL system to the hilt, one can simulate a studio set up on outdoors thru the compliments of several SB-800s or SB-600s flashing like strobes in multiple lighting set-ups where the photographer can control each of the speedlights flash output from the camera itself in the Commander Mode.


Columbia Digital Sales Company revealed a new revolutionary face of Nikon and officially launched its newest offerings, among which is the "The One" Privilege Card, an exclusive service card for Nikon users who owns at least an item purchased from 
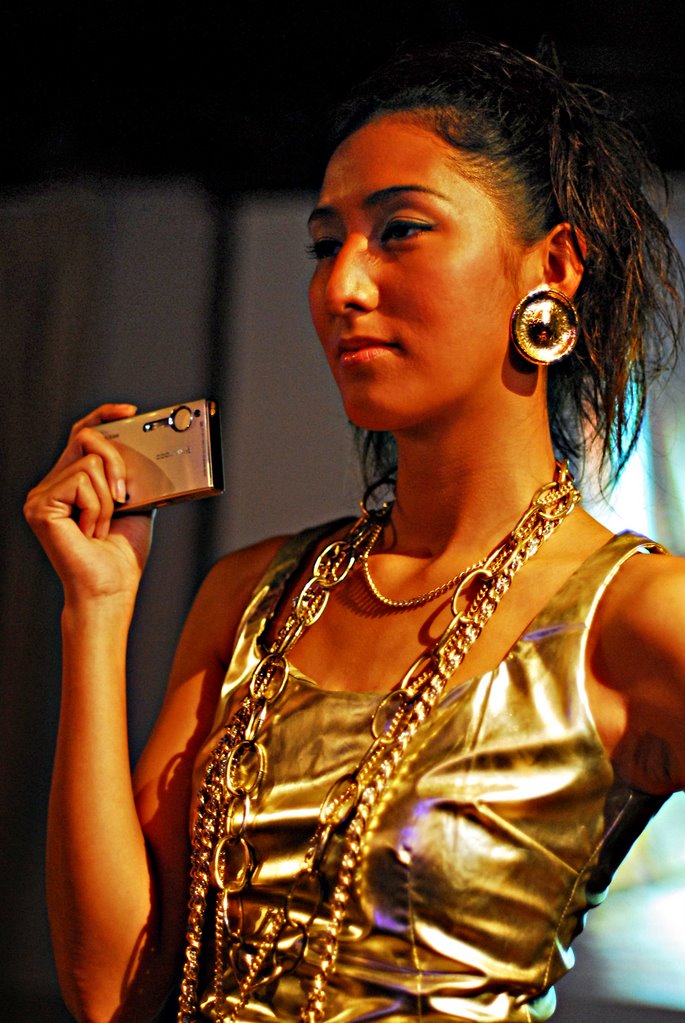
Columbia Digital Sales Company even if all the rest of the members' gear were sourced from somewhere else. The party was held at the Tavern on the Square located at Greenbelt, the hub of Makati's premiere entertainment place. Graced by at least 200 Nikonians, who were invited thru the online community, the event featured a mini fashion shoot where eight beautiful models paraded with Nikon's latest line of point and shoot cameras available in the local market today, namely, the Coolpix S10, Coolpix S9, Coolpix S7c, Coolpix L6 and the Coolpix L5.


These eight models were the subject of the on the spot Nikon Rebirth "Becoming" Fashion Photo Contest in four categories: The Bronze Beauty, White Wash, Color Splash and Yellow-To-Me, with the winner in each category getting a surprise package from Columbia Digital Sales Company. Deadline of submission of entries was yesterday, November 17, and winners will be judged by the "Big 3" Ad campaign endorsers, namely, Kai Huang, Lito Sy and Xander Angeles.

The best is yet to come for the Nikonians! Columbia Digital Sales Company will fortify its product range and marketing campaigns and will strive hard to accomodate even owners of gray market units, which unfortunately is killing their local presence. Despite this predicament, however, CDSC promises to lend a helping hand in uniting and making the Nikonians, a very proud and happy users and owners of Nikon products.

NB: the writer of this opinionated feature article has not, in any way, been paid by Nikon Corporation or by Columbia Digital Sales Company

Thursday, October 12, 2006

film-like digital black and white photos

My previous techniques in black and white conversion is not at all simple and easy as I have previously discussed. And as time goes by, we discover ways of improving our photoshop skills and I just discovered another photoshop way of approximating the film-like contrast of a black and white print from a black and white film where the blacks and the greys seem to be sharper.
The simplest way is not always the best way but if we can simplify our work flow with the least steps and at the same time achieving a desired effect, then, it is an effective way! Black and White conversion using the Channel Mixer is a very tedious trial and error of mixing and sliding the red, green and blue channel. An improvement which susbequently caught my attention is by using the Highlight/Shadow Adjustment Layer after the desaturation step but still, it didn't get the desired film-like effect, much more the simplicity i've been looking for.

I found a new b&w conversion technique in the CMYK Color Mode with the least complications thus far. Open your image, go to CMYK Color Mode, desaturate your image, then create a curve adjustment layer where you only have to push up the Black curve to increase the contrast and darken the grays into blacks!! as simple as that and for me it works. You can also add a tint of color by tinkering with the individual Cyan, Magenta and Yellow curves. Adding some film grain will further enhance your black and white images but for now, i'm satisfied with my new found conversion technique.

Many thanks to Jorgette for the modelling efforts...

Friday, September 01, 2006

getting rich and vivid colors in photoshop

Oftentimes, you wonder how you can emulate the richness and vividness of the photos taken on films compared to your dull and lifeless digital photographs. Film pictures radiate more impact. They have more punch and definitely more vivid and richer colors compared to unprocessed digital images taken from a digital camera.

We can fairly get close resemblance of film colors if we process our digital photos in the Lab Color Mode instead of the usual RGB Mode in Photoshop.

First, convert to a different color space (Image > Mode > Lab Color). In Lab Color processing, the colors can be harnessed and controlled much easier because they can be separated based on their lightness in Channel A and Channel B unlike in the RGB Mode where controlling the lightness will also affect either the Red, Green and Blue channels.
Using a Levels Adjustment Layer, select Channel A and change the values of the Input Levels to (55, 0.90 and 200). Do the same to Channel B using the same values. Don't worry if you'll get a highly saturated image.

Create another layer and this time a Hue/Saturation Adjustment Layer in order to fix the saturation and achieve a fairly natural colors. I prefer fixing the Red color first by sliding it to (-30) value, then the Yellow color by applying a (-20) value, then the Cyan color by sliding it to (-30) value then finally, the Magenta color by substituting it with a (-30) value. The values will of course depend according to your taste and may vary from one photo to another inasmuch as each may have different lightness.

By now, your image should appear like the sample photos I've uploaded. Since you are working on the Lab Color Mode, you can't save your work without going back to the RGB Mode, so go to (Image > Mode > RGB). You can now apply your other post-processing techniques like adding highlights and shadows, sharpening and other fixes you may wish to employ.


Model: Karla Paula Ginteroy
Fashion Consultant: Dexter Alazas

Tuesday, August 08, 2006

perspective distortion

Perspective distortion occurs when there appears an unusually or disproportionately large part or portion of your subject relative to its remaining parts when shooting a portrait using a wide angle lens at extremely short focal lengths. In this first sample I've posted, you may notice that the head is out of proportion vis-a-vis the entire body which appeared smaller and tapering down in size. The reason for this is that I used a 24mm focal length on my zoom (or in 35mm language, equivalent to 36mm based on Nikon D50's 1.5 crop factor) and I was very near the subject standing right in front of her with my camera slightly above her head.

This kind of distortion is dependent on the distance of the camera in relation to the subject you are shooting wherein the nearer you are as photographer to your subject or model, the greater this distortion would be. Some refer to this as a wide angle distortion which is also accurate in the sense that, you can only get this kind of distortion when you use a wide angle lens. Perspective distortion is often pleasant in landscape photos as they give a wider view of a scene but doesn't hold true in portraits where the nose appears relatively bigger as compared to any part of the face or head which is farther away in distance from the lens. There are instances when perspective distortion even enhances a portrait but most often than not, it ruins what otherwise would be a great portrait.

When shooting portraits, it is therefore recommended to use a short to moderate telephoto lenses with a focal length of 50mm to 125mm. If what is attached to your camera is a wide zoom, you can minimized this distortion on your portraits by moving back away from your subject, thus creating instead a pleasant environmental portrait with any conceivable background of your choice very much seen on the frame.

Tuesday, July 18, 2006

capturing still pictures on TVs

Shooting a television image is quite a tricky task especially if they are from a CRT screen. In the examples shown here, a high resolution flat screen was the medium and the pictures were shot in available light. When shooting a TV image, bear in mind that the picture takes a little time to form completely on the screen so you must try shooting at different shutter speeds until you finally get a clear picture.

I took these images on a trial and error approach until i discovered that at a shutter speed of 1/60, the images will stabilize without any ghosting and blurring. It is also advisable to use a tripod if shooting an image would entail you to use a shutter speed of less than 1/60. A much more effective apporach would be to freeze the frame if you're viewing a movie played from a DVD Player and from there make your test shots until you come up with a good image. There's no hard and fast rule here so experimention is always an option.

Sunday, July 09, 2006

dark tone photography

Dark Tone photography is becoming popular nowadays and it is a broader field in photography, inasmuch as it includes low key portraiture and grungy-feel pictures, which has commonly more depth and drama compared to high key photos. With this in mind, I decided to make an experiment on Ria's photos by using Photoshop to convert them into dark toned portraits. Dark tone images create some kind of a wow factor and draws more attention to the viewers to appreciate the photo and study it more closely.

In these dark tone images, the light which was captured in low key evokes more emotions and the photos sometimes talk to their viewers thru various sensibilities they impart. Using the layer mask in Photoshop, create two layers of curve adjustment with the first layer pushing the curve up to lighten the image while the second curve pulling down the curve to darken the image. Then using the brush tool on the second curve adjustment layer set at less than 50% opacity, you can choose those areas or portion of the picture which you would like to recover or restore to its original colors or contrast.

Another alternative method which I usually prefer would be using the gradient fill in the layer mask mode and by doing the same techniques with the brush tool, you can achieve a similar effect.

Many thanks to Ria Villacarillo for posing as a model in this series.

Saturday, June 10, 2006

Michaela

The human face is such an interesting, and perhaps the most explored, subject in photography. This set of portraits is particularly dedicated to Michaela whom i think is gifted with an x-factor and a cheerful smile which can transcend from one mood to another in an instant. Taking a good portrait is not only choosing the right face. Consideration should also be given to selecting the appropriate background and good composition or cropping style as well as the lighting available at your control.

Sometimes a plain backdrop will work best like blank walls and other single color background to avoid stealing the attention of the viewer from the main subject.

If shooting indoors, it's better to use a flash bounced off from the ceiling to achieve a more natual lighting effect, though sometimes shooting with available light can do more wonders if you're projecting a certain mood.

If you want to emphasize the face, try shooting at least from the shoulders and up or just go near or zoom in the face to concentrate on the facial contours. Focus on the eyes as this can to capture the emotion and the enagaging gazes and glances from your subject to create an inviting feeling that draws the viewer into the picture. Positioning the subject in off-center often yields better results than merely placing her in the middle or center of the frame.

Talking to your model before taking the shots should put her in a relaxed mood thus, allowing her to smile sponstaneously to project a certain mood and expression. Take charge and give instructions if what you're seeing is not to your own liking.

Monday, May 22, 2006

light painting

Light Painting is the slowest form of lighting and it is done by taking a photograph with a timed exposure then illuminating the subject using a light source to light up the part of a subject where you wish to be seen by constantly moving the light source during the duration of the time exposure.

how it is done? a complete darkness or a dark environment is a must so that you can paint the light while the shutter is still open in a timed exposure shot. i tried doing my version and here's what i got. this is a 10 second time elapsed shot of a rotating platter of a record player with red strobelight. then i painted a green color using a stick light on the portions of the photo that i wished to be lighted. red and green looks nice...

Friday, May 12, 2006

Bamboo, the Band

Bamboo is an alternative rock band fronted by Bamboo Mañalac, the former lead vocalist of Rivermaya, who founded the group composed of illustrative band members like Nathan Azarcon on bass, Ira Cruz on guitars and Vic Mercado on drums.

Bamboo and Nathan were from Rivermaya, then Nathan fused with Kapatid, worked with Ira Cruz who, together with Vic Mercado, were formerly members of Passage and that's how they came to know each other.

Perhaps tagged as the most popular band in the Philippines today, they have already released two albums, namely "As The Music Plays" and the "Love, Peace, Love". Bamboo won an MTV Pilipinas 2004 Awards for Best New Artist, Best Group and Favorite Song for "Noypi". Lead singer Bamboo Mañalac even managed to win an MTV style Award for Best Rock Style.

On the question on which is the better band, Bamboo or Rivermaya? well, Bamboo's vocal prowess was the key to Rivermaya's success as an alternative rock band.

The talents behind Bamboo is certainly more mature and their songs are livelier than ever although some say Bamboo's popularity is still no match to Rivermaya's more organized management and bigger fan base.

Rivermaya was once fronted by Bamboo along with Nathan on bass, Rico Blanco on keyboards, Mark Escueta on drums and Perf De Castro on lead guitars but Rico took over the limelight as the lead guitarist when Perf left the group due to some musical differences with some members of the band.


When Bamboo left the Rivermaya after releasing the Atomic Bomb album, Rico Blanco took over as the lead vocalist and propelled the band to a new musical dimension.

Rivermaya is presently composed on Rico Blanco on vocals and guitars, Japs Sergio on bass, Mike Elgar on guitars and Mark Escueta on drums.

Rivermaya won the Favourite Artist Philippines award at the recent MTV Asia Awards held in Bangkok, Thailand.

  Posted by Picasa photos taken during the Fresh capades Summer Escapade concert at the Harbour Square.

Sunday, April 30, 2006

sunset photography

Sunset photo graphy fascinates a lot of people because of the rich colors and warm tones they usually offer. One cool rule in shooting sunrise and sunset is to keep in mind that the sun rises in the east and sets in the west. We're quite lucky to have our Manila Bay on the west where the sun sets on the bay horizon.

Photo graphing sunsets can be tricky because the scene you may want to capture fades away in a blink of an eye, so an early preparation and set up of equipment is very much advisable. Perhaps, the best lens to shoot with is a tele-zoom lens with a range of at least 200mm on the far end of the zoom if you want to make the sun a bigger piece of object in your photo. When shooting with telephotos, tripod can be useful to eliminate or minimize blur.

With the advent of digital cameras where you can preview your shots, exposure settings can easily be had. I shoot sunsets before, during and after the sun appears on the horizon. In most cases, spectacular sunset shots can be had after the sun had already disappeared in the horizon. A good example of this is my photo of yachts below where the sky casts a visually appealing tone on the waters. Sunset shots taken before the sun appears in the sky are equally magnificent too and a good example of this are the first two photos above.

I occasionally under expose my sunset shots because of the over powering light of the scene. Since the sunlight may become so bright and dominant, don't stare at the sun for quite too long using your viewfinder to avoid any eye problem. I usually meter and adjust my settings in the manual mode with two to three stops underexposure either on the aperture or shutter controls but always choose a small aperture to achieve a more expansive depth of field. To add spice to a sunset shot, it also wise to frame some silhouetted figures such as boats, buildings, bridges, people or trees to impart a better scale, depth and perspective on the photo.

Another cool rule when taking sunset shots is never divide your photo in the middle. Either you emphasize the sky or the foreground but do not place the division in the middle. As you may see on the examples I've posted, emphasis is either given on the sky or on the waters depending on what you want to achieve. Sunset shots should either accentuate the colors of the sky or the reflections on the waters or both.

Posted by Picasa